Today is your last chance to win the Dremel pumpkin carving kit. You have just hours left to submit your photo. As of the publishing of this post, we have only one valid entry with 2 votes (amazing... people must hate free stuff). Don't be left out! Click here or go to our giveaways page if you need a reminder on how to enter.
After testing this product for a few weeks, it occurred to us that there are many more products that are very similar to this one (in that they create steam for a specific purpuse). With this in mind, we wondered if this clothing steamer could be used for other various steaming tasks. Of the several possibilities that immediately came to mind (steam bath, humidifier, vegetable steamer, etc.), one of them seemed like it would rate slightly higher on the fun scale.
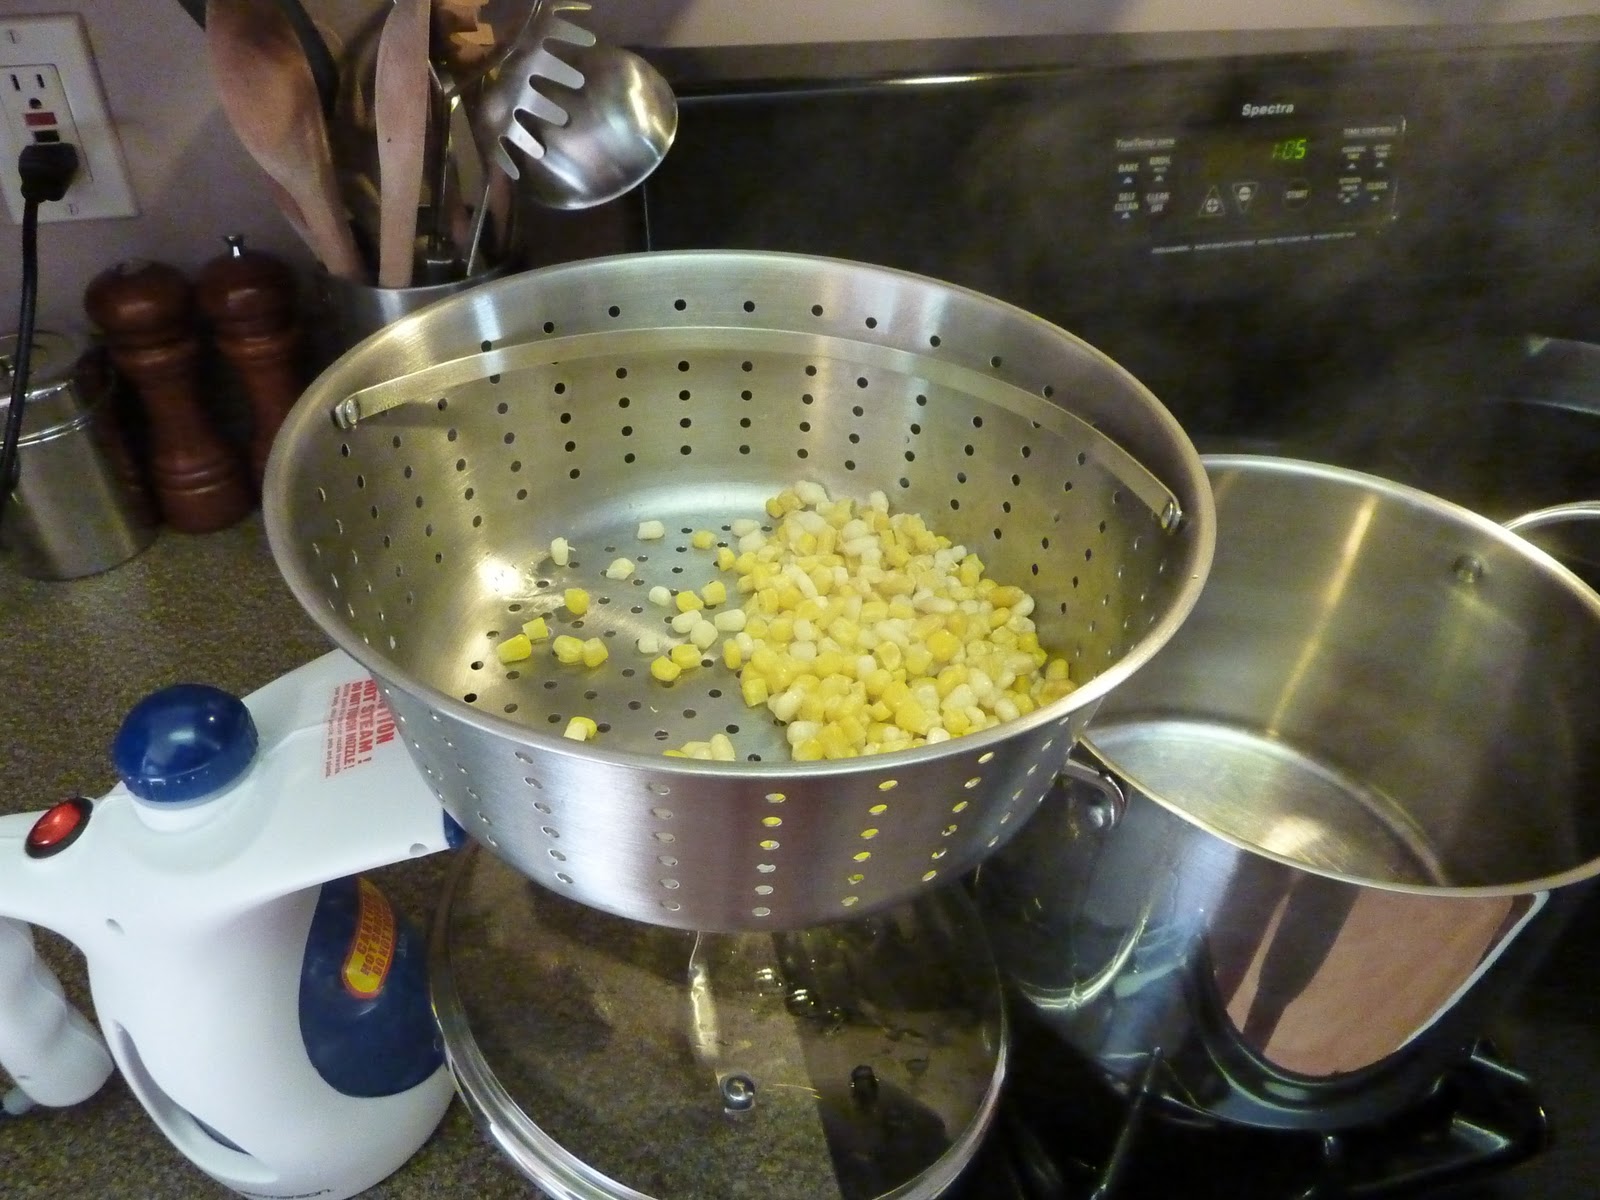
Intrigued by the vegetable steamer idea, we decided to test our theory. Why would you buy a vegetable steamer if you could just as easily convert your clothing steamer to do the same job? The core component of both of these is a heating element - the only difference is where/how the steam is delivered.
As long as you can come up with a way to deliver the steam to the vegetables, then the clothing steamer will become an effective vegetable steamer. Utilizing a pot and a steam tray, we were able to come up with the following rig to steam our vegetables.
With the steam tray resting nicely on the steamer head and the handle of a pot (which was, conveniently, the exact height needed), our vegetable steam test could commence. For this test, we chose frozen corn as our gourmet clothing steamer cuisine.
With everything in place and the steamer in the "on" position, the corn appeared to be cooking.
How did this test end? Approximately 1 hour and 3 refills later, the corn was finally cooked. Although this technique actually did steam the vegetables, you could probably find several more efficient methods. You might be tempted to ask: this method could be useful in an emergency, right? Yes... that is if your emergencies usually involve the loss of virtually all heat sources except for your Emerson Steamer... which happens to be powered by some form of electricity that is always available during emergencies.
Summarize:
Although this steamer may not be the best solution for your dinner, it is definitely a decent choice for your laundry. It gets a good score for being versatile, portable, and convenient. The one area where it falls short is that it can't compete with the crispness that you might be used to with an iron. Depending on your preference, the convenience factor may be enough to convince you even if it does fall short of an iron. Based on the varying utility of both appliances, we're convinced that any household would make good use of this appliance while still using the old iron from time to time.
VERDICT: RECOMMENDED but... don't toss your iron... or your vegetable steamer
Congratulations Becky! We will be sending you a private message shortly to get some shipping details.
Thank you to everyone else for entering to win. Stay tuned for more giveaways and product tests. If you want another chance to win something, our pumpkin carving giveaway is ongoing until Monday so hurry up and get your entries submitted!
Date of Purchase: August 23, 2010
Price: $22.95 Topics:
Normal use
Breaking the rules
Bang for your buck
Breaking the rules:
Sometimes it's more fun to live outside of the law, especially when the consequences are relatively moderate. This week's widget seemed to be placing an unreasonable amount of restrictions on us. In an attempt to rebel against the civilized world, we decided to break some of the rules.
Our rule breaking spree actually started while we were testing a claim (this is sort of our favorite thing). The "claim" is actually less of a claim and more of a marking or two on the side of the included re-filling container....
Could these measurements possibly represent the amount of water that one would need to operate the steamer for that amount of time? With that question comes a simple and easily verifiable answer. The results are as follows.
Water to the 5min level: Steam time of 5:05
Water to the 10min level: Steam time of 9:57
The results have spoken: the times on the side of the cup are fairly accurate. Naturally, the next thing that we decided to to was to fill the steamer to the "max fill" line and conduct a similar test.
Max Fill: Steam time of 19:13
Because the max fill line seems to be considerably lower than the top of the reservoir, our next step was to conduct the same test with the reservoir completely full. This is clearly against the wishes of the manufactuer... what do they know, anyway?
Over full
Although the steamer lasted over 30 minutes on a full tank, we would not recommend this for normal use. This is the part where the author of the user manual can sit back, sigh, and say "told you so." As you may have expected, there is definitely a good reason for the extra space in the reservoir and it might have something to do with boiling water. Have you ever boiled a pot of water after filling to its rim? It's kind of like that. With no other place for it to go, the boiling water violently spews out of the steam spout. Certainly not recommended.
Over heat
After getting a little taste of rebellion, we wanted more. For the next test, we wanted to know what would happen if you left the steamer on long after the water was boiled off. You may recall some sort of urban legend where a coffee pot could burn your house down if left on after the coffee is gone. With a similar heating element, this steamer ought to present a similar risk.
It seems, though, that the only thing you will end up burning through is your power bill. After roughly 8 hours of leaving this steamer in the "on" position, no significant event had occurred. Although we do not suggest trying this in your home, we're fairly sure that it won't start a fire unless, of course, it is strategically placed beside something extremely flammable (we wanted to try this, but there are some laws that we feel we shouldn't break).
One theory, of which we have no data to support, is that doing this on a regular basis will probably reduce the life of the product. Common sense, right?
Over tip
What happens if you tip the steamer on its side? Don't do this. For reference, see the "over full" section above and expect similar results.
Steam bath
In the spirit of violating rules and possibly the most dangerous of the tests we conducted on this steamer, we attempted to steam some clothes... fully clothed. If that didn't make sense to you, let us re-phrase... Imagine you are in a hurry and you realize that the clothes that you just put on are desperately in need of being de-wrinkled. With no time left to change, you only have one option - steam your clothes in place. Again, we feel the legal need to say the following: don't try this.
We did try this and the results were surprising. The steam, while very wet, was not nearly as painful as you might imagine. Although it may be an effective way to steam your clothes, the trade-off is your own personal comfort. If you can get over the extreme heat, you probably won't get over the fact that you feel as if you've just stepped out of a steam shower by the time you're finished steaming your clothes. We're guessing that you may want to feel a little drier before rushing off to work, but this is simply a matter of preference.
Date of Purchase: August 23, 2010
Price: $22.95 Topics:
Normal use
Breaking the rules
Bang for your buck
Normal Use:
Although our first thought was to put this steamer through some sort of terrible series of tests in an attempt to bring it to a quick and terrible demise, we fought the urge and proceeded to test it in a few "normal" situations...
Shirts
Pants
Dresses
Curtains
The main goal here was to answer the following question: Is this a reasonable replacement for your loyal and trustworthy iron? In order to answer this question, we simply used this steamer instead of an iron for one month. Our conclusion comes in 3 parts: quality, convenience, and versatility.
For this test, our "quality" score is the quality (a.k.a. wrinkle-free-ness) of the garments after being steamed. Sadly, the steamer falls just short of the old standby iron. Steaming clothes and ironing clothes simply produce differing levels of flatness. If flatness is important to you (obsessive, anyone?), then you will certainly notice the difference. To be absolutely clear, the steamer does remove the wrinkles - it does not, however, produce the crispness that you may achieve with an iron.
before... wrinkles, many
after... wrinkles, less, still not perfect
Where it may falter in quality, this steamer makes up in convenience. If you're constantly annoyed by the ritual that is inherent in ironing clothes, particularly finding a good place to set up your ironing operation, then this steamer may be your answer. In the convenience category, this steamer gets high marks for it's ability to do it's job quickly and with very little space. The issue of space is especially relevant if you happen to live in a small house or apartment and don't have a designated "ironing station" where you can leave your ironing board out and ready. A steamer needs virtually zero extra space - you can simply leave the garment on the hanger and get right to steaming, which is convenient if you're one of those who think about this sort of thing 10 minutes before you leave for work in the morning (you know who you are).
Versatility is our way of saying that this steamer can actually do some things that an iron could never do. Most notably, it can steam curtains... while they are still on the curtain rod. Have you ever tried this with an iron? Don't. Curtains, dresses, and other delicate and/or hard-to-reach wrinkles are now within reach. If you've ever taken an article of clothing to the dry cleaners simply because it was wrinkled and you didn't know what to do, this steamer may actually save you some money.
steam these in place
We're not going to make any claims about the cleaning power of steam, but we're aware that people are making such claims. If you choose to believe them, then consider that to be another benefit of owning a steamer. Don't stop washing your clothes though - society is depending on you.
If the above ratings were our only results, the Emerson Fabric Steamer would succeed in winning our recommendation, but we've got more to throw at this week's widget. We want to know how it handles some abuse, neglect, and maybe even some disaster situations. Check back soon for more on this widget.
Do you think you have what it takes to be the next pumpkin carving rock star? We want to know. Post a picture of your best piece of pumpkin artwork (from this October or any previous year) on our facebook wall. Please, no hijacked images from of the internet - we want pictures of your pumpkins (we're using the honor system here, folks).
Once you've uploaded your photo, tell your friends to 'like' it on facebook. We'll be giving away the Dremel tool to the person who gets the most 'likes' on their photo. Voting will end on Monday, October 18th to give you time to carve your masterpiece before Halloween.
Win this Dremel tool and (more importantly) become a Level 3 Pumpkin Sorcerer.
And remember, we're still taking submissions for our mp3 player giveaway. That's right, we're currently giving away two of our most recent items! Aren't we generous?
A particularly frustrating thing about this method of carving pumpkins is the task of creating light inside the pumpkin. Our first attempt was a candle, which failed. Our second attempt was 12 candles, which also failed. Our final attempt included a trip to our local home improvement warehouse for some more serious supplies.
Why did the candles fail? Two possible reasons come to mind:
They were simply not bright enough.
-or-
We didn't scrape enough material from our pumpkin.
After filling our pumpkin with multiple candles, we were convinced that it was #2. After spending several hours to produce our pumpkin creation (and a cramped hand), we abandoned the thought of spending any more time cutting on this poor gourd-like squash.
At this point, we opted for a more powerful (and more electric) light source. A stroll through several aisles of electrical supplies and hardware, we settled on two options:
A strand of rope lights
A single bulb work light
The advantage with the rope lights is that they will fit easily inside the pumpkin without modification whereas the work light is brighter but requires some extra cutting, depending on the size of your pumpkin.
ropelight
work light
If you're going for the more dramatic effect of the work light, we suggest that you use a fairly large pumpkin. Otherwise, you may have to improvise by making a few extra cuts. Here's how we made our smaller pumpkin work with the over-sized work light...
a small notch in the back gives us room to fit the light
with the switch facing outward, it can easily be turned on/off
the cord is hidden away in the back of the pumpkin
Warning: Use extreme caution whenever you mix electricity and pumpkins, especially if you plan on placing them outdoors.
A sticker of a jack-o-lantern on the side of the tool
Other than those simple items, this tool is simply a low-cost Dremel tool with two speeds (LOW and HIGH). If you have any other Dremel tool lying around at home (and begging to be used), this is your chance. You likely also have the correct grinding bit as well. It looks a little like these...
If you happen to have a set of bits like the one pictured, you will actually have the advantage of variety. You may be able to use the smaller bits on some tiny details and the wider bits to grind out the larger areas.
If you are currently Dremel-less and have been thinking about making a purchase, then don't make the mistake of thinking that this tool is for pumpkin carving only. As long as you can ignore the pumpkin sticker on the side of the tool, it should be quite useful for a wide variety of low-demand Dremel jobs.
So... Dremel Tool? Yes. Marketing Tool? Yes. This tool happens to be part of a series of variations that Dremel has cleverly marketed to specific user groups. For example, if you want the same tool (with a different name), you could order:
We're not sure if these are all the same model and we're not entirely certain what accessories are included with these other variations. The only point that we will attempt to make is that you could potentially purchase any of these to fulfill one need and easily take advantage of it's many uses. Compared to other Dremel tools, these specialty models are definitely at the low end of the price scale.
Practice Makes...
Perfect? Let's go with something closer to: Practice Makes Significantly Speedier While Only Marginally Making More Perfect. Our second attempt at another fairly simple template took a total of 1.5 hours from start to finish. While not the fastest jack-o-lantern on the block, fifty percent speed-up must count for something. Here's our quicker (and slightly friendlier) creation...
Date of Purchase: September 22, 2010
Price: $19.99 Topics:
First Attempt
Dremel Tool or Marketing Tool?
Practice makes...
Light Source Issues
Level 3 Pumpkin Sorcerer
Monday: First Attempt
This week's widget is a Dremel tool that happens to be a pumpkin carving tool - or a pumpkin carving tool that happens to be a Dremel tool (more on this concept in a later post). The basic concept here is that you can purchase this tool and use it to "carve" a pumpkin (more on this later as well). Today, we'll walk through every step in the pumpkin carving process, as outlined by the included instructions. Along the way, we'll also add several steps to the process that the Dremel folks may have overlooked.
The Dremel tool comes with a grinding tip and some patterns.
Before getting started, you'll need a few more supplies. Here's a shopping list:
Pumpkin (do we really need to list this?)
AA Batteries (the tool needs 4, not included)
Spray-on adhesive
Adhesive remover (buy it now and save yourself a trip back to the store)
Scissors
Knife
Spoon/Scoop
Copies of templates (if you plan on reusing them)
Light Source:
Candles (more on this later)
Work Light
-or-
Rope Lights
Extension Cord
Once you've gathered your supplies, you'll be ready to get started. The following are the Dremel instructions (directly copied from the included instruction sheet) and our corresponding commentary (in orange).
Use a knife to cut a lid for your pumpkin. Angle the knife towards the center of the pumpkin as you cut so that the lid will rest on top of the pumpkin after the cut has been made.
Use a large spoon to clean out the entire inside of the pumpkin. It is best if the walls of your pumpkin are approximately 1/4"-1/2" thick.
Based on the size of your pumpkin, you can enlarge or reduce the size of your template using a copy machine if needed.
We're assuming that steps 1-3 are tasks that most humans can accomplish on their own. Good luck. Now let's get to the more interesting steps.
Using spray-on adhesive, apply your template to the pumpkin.
Is it just us, or does this step seem to be lacking some detail? We have the adhesive, the pattern, and the pumpkin - is there something more to this?
Lacking further guidance, we have no choice but to dive right in and give it a try. First, we spray the adhesive on the pumpkin....
...and slap on the template. Is this right? Are those wrinkles supposed to be there? Why is this glue so incredibly sticky?
We're not sure if there's a better method to this step, but ours seemed to work out. If you don't happen to have spray adhesive in your glue drawer (and/or if you've never heard of it), be careful - using it is very un-fun.
As we learned during the next step, you'll want to make sure that every inch of the actual pattern is firmly stuck on the surface of the pumpkin and no air pockets are left. It's hard to describe what happens if you neglect this detail, but now you can't say we didn't warn you.
Insert additional step here. It should read: Grab your pumpkin and the tool and find a comfortable place to sit, as you will be grinding away for some time.
Turn the tool on LOW and begin tracing the areas to be removed.
Yes, you will be grinding straight through the paper and into the pumpkin. At first, you'll probably be nervous about grinding a pumpkin with a power-tool, but once you get used to the tool, it will become more natural. After using extreme caution with our first tedious part (the eye of our jack-o-lantern), we wondered how long this whole process would take. Don't worry, you will become faster with practice.
Additional step should read: Perform these steps over a drop-cloth, as you will be carving pieces of a pumpkin with a tiny spinning blade - which happens to make pumpkin paste (isn't that what they use to make pumpkin pie?) out of any piece of pumpkin that it touches.
You can use the HIGH setting for large area material removal. This should also read: You can use the HIGH setting once you have practiced on low setting and desire to carve a pumpkin in less than 3 hours.
The key is to remove approximately the same amount of material on your whole pumpkin to achieve a uniform depth. You may think that you've done a good job of this at first, but you haven't. Once you've cleaned off all of the pumpkin paste (we suggest that you do this over a sink), you'll see that you weren't quite as consistent as you may have figured. Don't worry though - you can go back to it with the tool and clean up the pattern later as long as you were able to color inside the lines the first time around.
Once you've finished, remove the paper template, place a light source, such as a candle, in the pumpkin, dim the lights, and see how well the light shines through your carving.
Once you've finished, you will have spent two hours of your life to get something that looks like this...
Then, you'll attempt to remove the paper template. It's interesting that the instructions mention this as if it's a simple task - it isn't. Remember that extremely sticky spray adhesive? As it turns out, it's still extremely sticky when you try to remove it. Who would have guessed? After your first attempt at removing the template, your pumpkin will look something like this....
If you were wondering why adhesive remover was on your shopping list, this is your justification. You'll need to do some major scrubbing with this stuff before your pumpkin starts to look like a pumpkin again and not a high school abstract art project. When you're finished with this "small" step, you will finally see the results of your work. This is when you may need to hit the pattern again with the tool to clean up the depth of your carving.
The next part of this multi-step step is to place a light source, such as a candle. Rather than using a candle, which doesn't give nearly enough light, we opted for a work-light (stay tuned, exploring this topic requires a separate post).
If you want more light to shine through, turn the lights back on, remove the candle, and remove additional material from your pumpkin.
This step leaves out one important detail: it is much easier to remove material from the inside of the pumpkin than it is to carve extra material from the pattern. As long as your pattern is uniformly carved, you can simply scrape the inside of the pumpkin to thin it out. If your desired light source is a candle, you'll have a lot more scraping to do.
Once you've finished all 9 (or 10 or 15?) steps, you should end up with something that looks like the frightening figure below. As mentioned, we used a work light with a 60 watt bulb, which seemed to create a fairly dramatic effect (just don't leave it out in the rain). Our total time to complete the project (not including several shopping trips) was approximately 3 hours. Our guess is that more practice will yield faster times.
Reduce. Reuse. Recycle.
Date of Purchase: 10 September, 2010
Price: $19.99/set of two
Today, we're exploring alternative uses of the Mister Steamy. Because this product has probably been sold in the millions, we can't help but think that there are many who have a set of two Mister Steamy dryer balls and no obvious use for them. Because we are advocates of the "reuse" concept (along with the other two R words), we're hoping that people will choose to find other uses for their failed products rather than placing them in a landfill.
Alternative use #1: Dog Toy. What made us think that this could possibly be used as a dog toy? We didn't. It was the dog's idea. In most cases, when this pup begs for something, she is tragically denied. In this case, her wish was granted.
In typical dog fashion, she quickly got to work with her task of tearing it to pieces. Unfortunately, she found success much more quickly than we had planned. Within minutes, the inferior dog-bite-durability of the Mister Steamy was obvious. Bad dog!
Alternative use #2: Antenna Ornament. Because the Mister Steamy has a foam core, it could easily be attached to the top of a car antenna, reminiscent of your favorite smiley face or 8-ball from your "younger" years (you know who you are... you're likely keeping these in a box somewhere with your furry dice mirror ornaments and clever vanity license plates). Unfortunately, our family sedan doesn't have a traditional radio antenna, so we were unable to test this innovative use of the Mister Steamy dryer ball. Try it out for yourself and let us know if you get any honks!
Alternative use #3: Golf Tee Marker. In the rare case that someone reading this post happens to own/operate a golf course, you may benefit from this. Rather than spend a fortune on more expensive tee markers, you could simply place a set of Mister Steamy dryer balls on each tee. The minor disadvantage of this is that you most likely only purchased one set and you'll have to purchase several more sets in order for this to be an effective tee marker solution. On a typical golf course, there are usually three sets of tees on each hole and 18 holes on the course. This means that you would need to buy 54 sets to cover the entire golf course, coming to a grand total of $1079.46. Unless you happen to get a volume discount, maybe this option isn't as economical as we first thought.
A little creativity can help give terrible products new life and hopefully keep garbage out of our landfills. Maybe someday people will stop producing (and creatively selling) these absurd products. Until then, we'll just have to find new and inventive uses for our junk. We encourage you to find practical uses for this and other items that you may have purchased off of the television. Not only is this a fun (and free) activity/hobby, it may even help you to overcome that tremendous buyer's remorse that you will undoubtedly have after buying the Mister Steamy.
P.S. Dear Mister Steamy lawyers: all comments and topics are strictly the opinions of the author and not based on anything factual or scientific in any way.


 Over full


 Alternative use #2: Antenna Ornament. Because the Mister Steamy has a foam core, it could easily be attached to the top of a car antenna, reminiscent of your favorite smiley face


